

By the beginning of the 1850's, residents of Southern New Mexico Territory and the Gadsden Purchase began petitioning Washington to create a new territory. Southerners were especially supportive because of the prospects for a Southern Transcontinental Railroad. However, because of the issue of whether the new territory would be slave or free, the bill quickly died.
Following the beginning of the Civil War, secessionists in the southern part of the New Mexico Territory called upon the Confederate Congress to accept the “Provisional Territory of Arizona” into the Confederacy. But, despite secessionist tendencies, this land was still largely occupied, albeit sparsely, by Union Soldiers and it was therefore awkward to claim independence without some supportive military.
In order to solidify the Confederate Hold in the region,
several hundred members of the Second Texas Mounted Rifles under the command of
Lieutenant Colonel John Baylor engaged Union Forces in the First Battle of
Mesilla on July 25, 1861. Union Forces,
under the command of Major Issac Lynde, were forced to retreat and abandon
their post at Fort Fillmore.
Following this victory, Colonel Baylor appointed himself Governor
of the Confederate Arizona Territory, solidifying the Secessionist Rule. On February 14, 1862, President Jefferson
Davis, approved by Confederate Congress, proclaimed the official creation of
the Confederate Territory of Arizona out of the Southern Half of the New Mexico
Territory with territorial seat in Mesilla (near modern day Las Cruces). Officially, the territory was all land south
of the 34th Parallel.
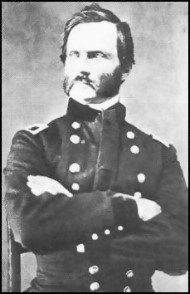
 |
| General Henry Sibley - CSA |
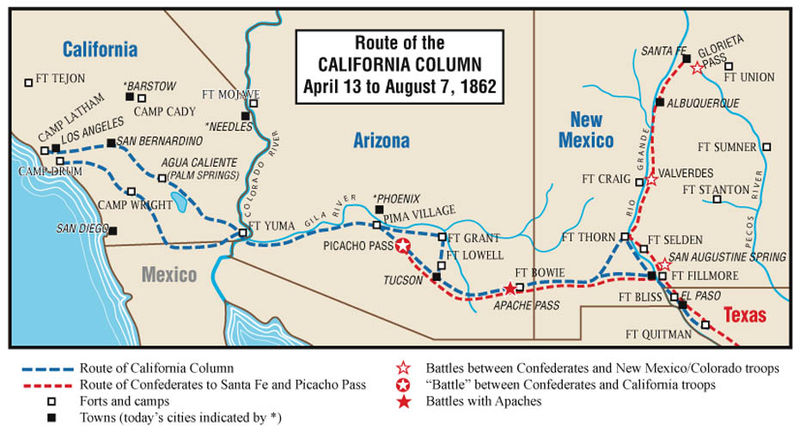
In order to prevent this, Colonels George Wright and James
Carleton in California wrote to the Federal War Department for permission to assemble
regiments of California Volunteers and push through the Arizona Frontier to
Mesilla and the Rio Grande removing the Confederate threat and providing relief
for General Edward Canby’s forces in Santa Fe.
 |
| Colonel Edward Canby - U.S. Army |
This order was immediately approved by Washington and troops
from California were then forwarded to Fort Yuma along the Colorado River thus
creating the “California Column”
The following is a list of the composition of the column and
their command
- 10 Companies, First California Infantry – Col. J. H. Carleton
- 5 Companies, First California Cavalry – Lt. Col. E. E. Eyre
- Light Battery A, U.S. artillery – Lt. J. B. Shinn
- Company B, Second California Cavalry – Cpt. J. C. Cremoney
- 10 Companies, Fifth California Infantry – Col. G. W. Bowie
In total, the California Column number 2350 Strong.
**********************************************
**Muster at Fort Yuma**
Go to Sunrise Point Park near Yuma, AZ. It is across the street from the Fort Yuma Indian Hospital which is on the site of the original Fort Yuma
Park in the Lot off of Levee Road near the restrooms.
From the restrooms walk south along a dirt road a the base of a bluff, passing the Vital Native Trees are on the right.
Contine and bear right at the Y.
Pass 2 green in-ground boxes on the left, stopping at a single grey in-ground box.
From the left edge of the road, alongside the grey box, sight 230 degrees and walk 13 steps, stopping on the right edge of the road.
From here sight 320 degrees and walk upslope 20 steps to a creosote bush. Box is on the uphill side under a small SPOR.
Thanks to AZRoadie and Desert Flower for planting this box
********************************************************************************
Largely, the column followed the preexisting route of the
Butterfield Overland Stagecoach, a mail service that was canceled at the beginning
of the war. Union sympathizers would then
assist the soldiers by collecting food and fodder at predetermined stations.
One such station was Stanwix Station near the current city
of Gila Bend. This sight is also
frequently referred to as Grinnel’s Station, Grinnel’s Ranch, or Flap-Jack
Ranch. Near this location on March 29,
1862, members of Captain McCleave’s Company A, First California Cavalry
encountered roughly 10 Confederate soldiers under the command of Lt. J. W.
Swilling burning hay along the route.
Because the Confederates were outnumber (there were roughly 3 Companies
of Union soldiers numbering 272 nearby), they fired a volley at the picket and
then ran. Chase was given, but to no
avail. In the end, one member of the
Union line was injured, marking the westernmost skirmish in the entire Civil
War.
******************************************************************************
**Skirmish at Stanwix Station**
From Interstate 8, take exit 78, Spot Road.
On the north side take the Frontage Road east for approximately 1 mile and then turn north onto Avenue 76 E.
Drive north about 7 miles on a single lane dirt road. Suitable for most 2-wheel drive cars unless there have been recent rains.
As you drop down in the Gila River area, there will be a brown kiosk on the left, continue to the end of the road at Sears Point BLM site.
According to research done by a Yuma Eagle scout, this is the approximate location of Stanwix Station, see sources.
From the Visitor Log, walk west to the third Carsonite (brown) BLM stake.
Sight at 240 degrees and walk 62 steps to a large, flat, leaning boulder. (at 55 steps you will be between 2 creosote bushes)
Box is under the NW corner of the boulder, tucked underneath and behind a single, fist-sized rock.
There are two other boxes located along this route.
Thanks to AZRoadie and Desert Flower for planting this box.
*******************************************************************************
The Confederate Soldiers engaged at Stanwix Station were
members of Company A of the Arizona Rangers, a small detachment based out of
Tucson, Arizona under the leadership of Captain Sherod Hunter. Hunter’s men, by orders of General Sibley,
were instructed to delay the California Column while protecting the
Secessionist from Apaches.
 |
| Monument at Picacho Peak State Park, AZ |
This conflict came to a head by the middle of April, 1862. Following the skirmish at Stanwix Station, Company
I, First California Infantry under command of Captain Calloway along with
detachments of Company K, 1st Infantry, and Companies A and D, 1st
cavalry made their way without event to Amni White’s Mill (Mr. White being a
union sympathizer) near the Pima Villages along the Gila River. From this point, Calloway was instructed to
march onto Tucson and oust Hunter from there.
As they moved south and approached Picacho pass, Indians
reported that confederate soldiers were in the immediate front. A detachment was sent to go wide around the
peak to flank the enemy while the main body was to head through the pass and
assault the enemy head on.
On April 15, 1862, Lt. James Barrett and a detachment of 11 cavalry
men from Company A engaged a detachment of 10 Confederate cavalry men under
direction of Sergeant Henry Homes. This
minor skirmish resulted in 3 killed on the Union side, including Lt. Barrett
and 3 wounded and 3 Confederates captured.
The remaining Confederates escaped to Tucson where they alerted Capt.
Hunter of the coming Column
******************************************************************************
**Skirmish of Picacho
Pass**
Go to Picacho Peak State Park just off the I-10, exit 219, 40 miles North of Tucson.
There is a 7$ day-use fee.
After the entrance station, make two immediate lefts onto Memorial Loop. Here there are several monuments, memorials, and informational signs about the Skirmish.
South of the Ramada, take the Nature Trail/Calloway Trail. At the next signed intersection, continue on the Calloway Trail and again at the second intersection. Go until you find a white trail sign at a left turn. From the sign, count 13 wooden steps. Standing on the 13th step, go 25 steps at 50 degrees magnetic to a juvenile saguaro cactus. About 10 feet north of the cactus is a large boulder. The box is in a crevice on the North-East side.
********************************************************************************
Following the Battle, Captain Calloway and his entire
command retreated from Picacho pass, believing that there was a much larger
force of Confederates in Tucson than actually was. Calloway led his troops back to the Pima
Villages eventually meeting up with Colonel J. R. West and his detachment (1
company of cavalry and 4 infantry).
There, believing that Tucson was heavily defended, West ordered the
creation of an earthworks to protect White’s Mill. This site became known as Fort Barrett after
the Lieutenant who died at Picacho.
However, Captain Hunter was short staffed. And, after the battle of Picacho Peak, he saw
that a direct assault upon Tucson was imminent. Hunter requested 250 soldiers from Governor
Baylor to be sent post haste, but the New Mexico front could not spare any men
on account of the far more imminent threat of Union soldiers around Santa
Fe. As such, Hunter and his 80 men
retreated from Tucson to the Rio Grande, leaving behind
only a small squad for observational purposes only. In his retreat one of Hunter's squads was ambushed on May 5th by Apache
Raiders near Dragoon Springs and the Butterfield stage coach near there.
The confederates were greatly outnumber (reports stated that there were about 100 Apaches) and retreated quickly, leaving behind a large number of cattle, horses, and mules and four dead†. Hunter ordered his men to make a couterattack on May 9th to reclaim the livestock and the dead. The soldiers were successful in their attack, killing 5 Apaches at no loss of their own. They then buried their dead near the stagecoach and pressed on to the Rio Grande. Thus marked the furthest (known) Confederate casualties of the Civil War and only casualties to occur within contemporary Arizona.
********************************************************************************
**Ambush at Dragoon Springs**
From the I-10, take the Dragoon Road exit 318. Follow the road three miles east into the town of Dragoon. After crossing the railroad tracks, make an immediate right onto N Old Ranch Road. This is a pseudo maintained dirt road, and high clearance is recommended but not required. Follow Old Ranch Road 2.3 miles to a signed junction that reads "Jordan Canyon. Stage Station". Park and walk or drive down this road about 1 mile to the Dragoon Station sign.
Follow the trail North through the fence and to the station and graves. From the southern corner of the station look south-south east for a group of Yucca. The box lies under the SE side.
Please be respectful to those buried here. Unlike their Union counterparts, who (with the exception of Lt. Barret whose grave couldn't be located) were moved to and buried with honors in San Francisco, these men rest in general anonymity on the ground they died on.
**********************************************************************************
 |
| Colonel Joseph West - U.S. Army |
After receiving some advice from Colonel Carleton still at
Fort Yuma, Colonel West made plans to attack Tucson under the belief that it
was still heavily defended, even though he had information that suggested
otherwise. West intended to leave Fort
Barrett with Companies B, 1st Cavalry, and C, I, and K, First
Infantry, and B and G, Fifth Infantry, leaving behind Lt. Col. Eyre with four
companies to defend Fort Barrett.
Because of a lack of water along the Butterfield Route, and the danger
of an attack from the west, West’s plan was to march east from the Pima
Villages to the abandoned Fort Breckenbridge at the confluence of the San Pedro
and Gila Rivers. From there, the army
would march south through the Canyon de Oro and attack Tucson from the North
and East (the belief being that a direct attack from the Butterfield Route and
thus the West, would be too heavily defended).
On May 14th, West and his command left for Fort
Breckenbridge and from there carried out their maneuvers without event. On May 20th, 1862, Captain Emil
Fritz and Company B, 1st Cavalry entered Tucson from the North and
East while four of the infantry companies entered the city from the West. The city was found to be abandoned as Hunter
had left a week before and the residents had been warned off by Hunter, most
likely hiding to the south in Sonora, Mexico.
2000 men invaded; no shots were fired.
************************************************************************************
**Capture of Tucson**
Go to Fort Lowell
Park at the corner of
Glen Street and Craycroft Road in Tucson. Fort Lowell was the successor to the post established by the Union soldiers.
Continue East on Glenn to the second entrance into the park. The sign should say access to Ramadas 5-7. As you reach the parking lot, take a right across a small bridge to the back lot. Park here.
At the north east corner of the lot, there will be a pebbled trail, follow this down to Ramada 7. Near the Ramada are 2 white poles, behind the eastern most pole is a trail going down. Follow this trail. (You should be approaching the Pantano Wash)
You will eventually come across a sandy clearing with an bench to your left with a piece of rock art behind it.
Follow a sandy trail
north keeping the Pantano Wash on your right.
When the White Pole and the old windmill are aligned, go up the steep
slope to a group of 4 Mesquite. The box
is under a SPOR.
***********************************************************************************
 |
| Colonel James Carleton - U.S. Army |
Colonel Carleton, by this time had made it with the Rear Guard to Fort Barrett, leaving Colonel Bowie in command at Fort Yuma. From there he instructed Col. West to deploy troops to Fort Buchanan (found destroyed) in the south and continued occupation of Fort Breckenbridge.
Aside from these orders, which were eventually rescinded on
account of the obsoleteness of both forts, the California Column could continue
no further. The summer heat would make
it both difficult and dangerous for the Column to press on to the Rio Grande. What food there was had to be brought up from
Mexico or trucked hundreds of miles from Ft. Yuma. Additionally,
there was no word from the Rio Grande.
Communication between Col. Carleton in Tucson and General Canby near
Santa Fe was non-existent.
However, in an act of both heroism and luck, a sole man,
expressman John Jones, managed to make it to the Rio Grande and get word to
General Canby that the California Column was coming. This was done in spite of his group being
killed by Apaches and himself being captured by the rebels.
Then, on the 21st of June, the advanced guard
under the command of Col. Eyre left Tucson for the Rio Grande. This group made it to Fort Thorn on the Rio
Grande (Near present day Hatch, NM) by the 4th of July and would
have then descended upon Mesilla and the rebels if not for restricting orders
from General Canby’s men.
 |
| Mangas Coloradas - Ally to Cochise (never photographed) Chiricahua Apaches |
This attack, and many similar events, prompted Carleton (by
then promoted to Brigadier General) to establish a permanent fort at Apache
Pass. This fort was known as Fort Bowie.
*********************************************************************************
**Battle of Apache Pass**
*********************************************************************************
**Battle of Apache Pass**
NOTE-Although the box is near the NHS, it is not on National Park Land.
Go to the Fort Bowie National Historic Site. It is most easily accessibly by taking AZ Route 186, 22 Miles SE of Willcox, AZ. You can also reach the site and box coming from Bowie, AZ.
Between mile markers 7 and 8 and west of the trail head to Fort Bowie, there is a turnout on the North side of the road. Park, and follow the Lookout Trail on the south side of the road to an information sign. From the sign, follow the wildcat trail generally south 93 steps to where the trail crosses over a boulder. Eleven steps uphill from this point is a split boulder. The box is in the crack.
*********************************************************************************
Over the next week, the remaining troops in Tucson were
reassigned to duty along the Rio Grande with Carleton’s command eventually
reaching Fort Thorn by August 7th.
The rebels by this point had left the Arizona
Territories. As Col. Eyre arrived at
Fort Thorn, Col. Steele and what remained of the Mesilla defenders retreated
into Texas. Sibley’s Brigade, although
initially successful, had been beaten by Col. Canby at the Battle of Glorieta
Pass. The rebel threat in the west was
essentially non-existent.
General Carleton eventually received Col. Canby’s position
as Head of the Department of New Mexico.
The Column was then dispersed across the vast territory. Although there was often rumor of another
Texas Brigade invading the territory, there was little if not no further
contact with the rebels and the Column spent most of its time defending
themselves and locals against Apaches.
After given command over the Department of New Mexico, Carleton
wrote the following about and to the California Column.
“General Orders No. 85.
In
entering upon the duties that remove him from immediate association with the
troops constituting the ‘Column from California,’ the Commanding General
desires to express his grateful acknowledgment of the conduct and services of the
officers and men of that command.
Traversing a desert country, that has heretofore been regarded as
impracticable for the operations of large bodies of troops, they have reached
their destination and accomplished the object assigned them, not only without
loss of any kind, but improved in discipline, in morale, and in every other
element of efficiency. That patient and
cheerful endurance of hardships, the zeal and alacrity with which they have
grappled with, and overcome obstacles that would have been insurmountable to
any but troops of the highest physical and moral energy, the complete
abnegation of self, and subordination of every personal consideration, to the
great object of our hopes and efforts, give the most absolute assurance of
success in any field or against any enemy.
California
has reason to be proud of the sons she has sent across the continent to assist
in the great struggle in which our country is now engaged. The commanding General is requested by the
officer who preceded him in the command of this department [Colonel Canby], to
express for him the gratification felt by every officer and soldier of his
command at the fact that troops from the Atlantic and Pacific slope, from the
mountains of California and Colorado, acting in the same cause, inspired by the
same duties, and animated by the same hopes, have met and shaken hands in the
center of this great continent.
(Signed)
James H. Carleton.
Brigadier
General U.S. Volunteers. Commanding Department”
As always, Double Bag and rehide well.
If any of the clues are confusing or out of date please
alert me.
†There is possible evidence that only two rebels (S. Ford and Ricardo) died at Dragoon Springs and that the remaining two graves are those of 3 Butterfield workers massacred in 1858 with 2 buried in one grave.
Sources:
Pettis, George Henry. (1908). “The California Column: Its
Campaigns and Services in New Mexico, Arizona and Texas During the Civil War” Historical
Society of New Mexico.
The War of Rebellion: A Compilation of the Official Records
of the Union and Confederate Armies, Vol. IX. Chapter LXII Parts 1 & 2 Operations
on the Pacific Coast. January 1, 1861-June 30, 1865.
Wikipedia Articles
http://www.yumasun.com/features/local-boy-scout-pinpoints-civil-war-skirmish-site/article_8677060a-6eb2-11e3-8268-0019bb30f31a.html
Warfare is a fascinating subject. Despite the dubious morality of using violence to achieve personal or political aims. It remains that conflict has been used to do just that throughout recorded history.
ReplyDeleteYour article is very well done, a good read.
Warfare is a fascinating subject. Despite the dubious morality of using violence to achieve personal or political aims. It remains that conflict has been used to do just that throughout recorded history.
ReplyDeleteYour article is very well done, a good read.